Salmon Pasta in a Garlic White Wine Sauce

This is without a doubt one of my favourite meals of all time. I’m trying desperately to cut down on the carb, cause for some reason they live with me for months after they have been consumed, but when you serve up one of these babies, I am more than happy to accommodate those carbs anywhere they want to go. 1397719837051

So May 7th 2014 we voted in the fifth South African democratic elections. In my world of food, this means another excuse to cook. Of course, in reality we ended up going to the hood; voting and then going for a drink at the local watering hole. A visit to the watering hole often means we won’t get home at a decent hour – which ordinarily would throw my cooking schedule right out the water but not yesterday. I was wise enough to defrosted four Salmon steaks – I had a vision. Hahaha.

This recipe is so quick and easy to make and if you had to order this a restaurant, you will end up paying an obscene amount of money for something you can whip up in your kitchen in less than 20 minutes.

Of course it is advisable to use fresh Salmon but sometimes that’s not possible so I always make sure I have at least one pack of four in my freezer.

Salmon Steak

Ingredients:
4x Salmon steaks / fillets
1 whole onion (finely chopped)
A pocket of button Mushrooms
Garlic (crushed)
1 cup (250ml) of fresh cream
Chilli (green)
Fish spice
Ground black pepper
Mix herb
Pinch Salt
Penne Pasta
Olive Oil
1 tbsp Basil Pesto
Half a cup of good quality white wine (Sav Blanc or Chenin Blanc, it’s really up to you)

You will be surprised at how easy and tasty this meal will turn out, even for the amateur cook.

Method:
Put a medium sized pot of water on the stove. Fill the pot half way and let boil. The most economical way to do this, is actually to boil the water in the kettle and decant into a pot on the stove. This not only saves you electricity but quickens the process. Add a pinch of salt to the water and add your pasta. Now for this recipe, I prefer to use penne pasta but that doesn’t mean this recipe only works with penne. You could use fettuccini, spaghetti, sedani whatever really.

Penne

Spicing your Salmon.
It’s advisable to only spice the fleshy side of the fish. This is because when you cook it; the fleshy side is what will suck in all the flavour. Rub your mixture of fish spice, black pepper and mixed herb onto the fish, sprinkle slightly making sure you cover the fish but don’t overwhelm the fish. Salmon is a tasty, flavourful fish, the only reason we add these spices is for additional flavour, not to create another taste.
Place a non-stick pan on the stove, drizzle sufficient olive oil just to coat the base of the pan and again don’t overdo it. Turn up the heat to let the pan heat up.

Once the pan is hot, place your salmon skin side down. Here is a trick many don’t know, when you pan fry fish, always start with the skin side and let that fry for about two minutes before you disturb it. Don’t poke and prod or rock the pan to avoid sticking. Actually, you can push your fish down gently with a spatula, (it is tempting to check – DON’T) you will be surprised. Your fish will stay intact and the skin will not peel off. Trust me on this one. Give your fish another three minutes on the fleshy side and then remove and let rest.

Salmon-in-a-pan-003

In the same pan add a small amount of olive oil, add the chopped onion, garlic and mushroom. Let that mixture fry for about a minute. Once your onion begins to turn translucent, add a slash of wine. This will realise what other people would normally have washed out of the pan, but my peoples, that’s where the flavour hides. Let the alcohol cook away. That should take about another 30 seconds to a minute.

Mushrooms

In that minute, while the alcohol leaves your wine, chop up your salmon steaks. I like them chucky, some people like then smaller. Word of advice; don’t make the pieces too small because they will break up further when added them to the sauce.

Now, put your salmon back into the pan with the onion, garlic, mushroom and wine for about 30 seconds. Add the cream, drop the heat to moderate and cover for about 2 minutes. Remove the lid and stir gently. Turn down your heat to low and add grated parmesan cheese and basil pesto.

Add salt and pepper to taste.

There are two schools of the thought when it comes to serving. Some people want to mix the salmon sauce into the pasta and have one giant pot of goodness, which is fine but I find that if you have not measured your ingredients properly (which comes with practice) you run the risk of having less sauce than pasta, which will result in a rather dry dish.

My way is simply, when serving, put your pasta in a bowl, then add as much or as little sauce as you want. This gives you better control and you never run the risk of a runny soggy dish or a dry and bland pasta.

Serve with freshly chopped chilli and garlic.
fresh-chillies-green-chili-birds-eye-chilli-2 imagesZ1DBWJ0L

Guys, Enjoy. I always do. This meal never disappoint and even my six year old who loathes the idea of fish, cleans up.

Beer Batter Fish and Chips

When I was younger, I remember my mom coming to fetch me from school after a transport mix up. I was in tears because I was the only one left at school and I’m sure her heart was bleeding for me. We took a long walk up to the taxis and instead of going straight home, we took a detour to Rosettenville to find ourselves some fish and chips from that dingy Portuguese corner café. (Mama knows best). The fish batter was so crispy; the fish on the inside was soft and tender yet cooked and seasoned to perfection. I dunked it into the tartar sauce (which I didn’t know was tartar sauce) and drench my chips in salt and vinegar. Mama knew exactly what to do, to make it all okay.

98eb7eed39382d5fda78cbfcf476d608

Over the years I have found that it has become more and more difficult to find these kinds of corner cafes. And with this recipe I’m trying to revive the wonder of the simple Fish and Chips, but in true Pot’s style there must be a twist. The principles are exactly the same but let’s include coriander.

Let’s Go Down Memory Lane……..

fda3688c1df4bde072fc50c258221c7f

Ingredients
• 2 Cups (250 grams) all-purpose flour
• 1 teaspoon baking powder
• 1 bottle (340ml) of beer
• 1 teaspoon salt
• 1 teaspoon freshly cracked black pepper
• 1 teaspoon garlic powder
• ½ teaspoon cayenne pepper
• 3 tablesppons of dried coriander (Not Ground)
• 6 fresh hake fillets, cut into long strips
• Canola oil for frying (This oil is a bit healthier than Sunflower oil
• Lemon wedges for drizzling
• Fresh parsley for garnishing

Method
1. In a large bowl whisk together the flour, baking powder and beer until you have a smooth light batter. If the batter is too thick add a little more beer to thin it out. If the batter is too thin add a bit of flour to thicken it up. It needs to have the consistency of Yogi-Sip. Cover with glad wrap and let the batter sit for between 30 – 60 minutes.

IMG_1736

2. Cut the hake fillets into strips. Pat the fish down with paper towels to make sure it is completely dry. Season both sides with some salt and black pepper, garlic powder, dried corriander and cayenne pepper. In a shallow dish, pour the 1 cup of flour, some salt and black pepper and stir to combine. This is the dredging; we make this so that the beer batter can stick to the flesh.

DSC_2477

3. In a large pot heat the oil to 190 degrees. Fill the pot up half way, this is to make sure that when the fish hits the oil, it is completely submerged.

4. Work with one strip at a time, dip the fish in the seasoned flour, coat evenly on both side. Then dip the fish into the beer batter, to a point where it is completely covered. Drain excess batter before carefully dropping the battered fish into the hot oil.

copy-of-img_9316

Please be carefully, oil burns hurt and last for weeks. Don’t overcrowd the pot, work in batches. Fry for 4 to 6 minutes on the first side. Flip it over and continue to cook for another 2 to 3 minutes on the second side. Only flip the fish once. Remove from the oil and drain on paper towels. Transfer to a cooling rack placed on top of a baking sheet. Repeat with remaining fish. To keep the fried fish warm and crispy until ready to eat, place the baking sheet in a 100 degree oven.

flat,550x550,075,f

Bread and Rolls

Bread is without a doubt one of God’s most fab gifts to man.
Go anywhere in the world and there is some kind of bread.

The end result is always such a fab thing.

The end result is always such a fab thing.

How to make the perfect bread roll.

The idea of making bread is daunting to most people. When, in fact it really shouldn’t be. Yes so maybe your first attempt will be a royal flop – that comes with the territory. All one really needs to do is follow the instructions to the ‘T’ and you are laughing. Obviously with time and experience, you will realise that it really is one of the easiest things in the world.

Here Is How:

Ingredients:
4 cups bread flour
2 teaspoon active quick rising dry yeast
2 teaspoon salt
1 1/2 cups warm water

Method:

1. Put 1/4 cup of bread flour on your clean counter top and reserve. Place remaining 3 3/4 cups bread flour in a bowl. Spoon the yeast on one side of the bowl, and the salt on the other side. Pour in the warm water and bring all the components together until the dough comes together in a mass. Dough should clear the sides but stick to the bottom. If it is too sticky, add 1 tablespoon of flour at a time. If too dry, add 1 tablespoon of water to dough to adjust.

Let the dough rest for 5 minutes.

2. Take the dough out and place on the counter. Remember that 1/4 cup of flour that we reserved? We’ll use it now. As you knead the dough by hand, incorporate more flour as you need.

Knead by hand until the dough is very satiny, smooth, tight and formed into a nice, compact ball:

french-bread-dough-ball

3. Place this dough in a large lightly oiled bowl. Turn dough over so that all sides have a thin coating of oil. Cover with plastic wrap and set in warm place for 1 1/2 hours to let rest and rise. Dough should almost double in size. While the dough is rising, about 1 hour into the rising stage, preheat your oven to 180 degrees.

4. After the dough has risen fully, punch dough down and form back into a ball. Poke your finger on the surface – the dough should give into the pressure and slowly creep back up.

5. Now for some fun. Cut the dough into half – you’ll shape one half at a time (keep the other piece under wraps). Pick up the dough – stretch it out until it forms a big rectangle. Dust your work surface with flour and fold over the ends of the dough.

Now do a little “karate chop” lengthwise down the middle of the bread and stretch out the long ends again. Fold over in half. The karate chop helps get the middle tucked inside. Pinch all sides shut. This is important – you want to make sure that all ends including the short ends are pinched tightly to create a seal. This allows the bread to rise & expand up and out evenly. If the bread looks a little lopsided, you can try to fix it by letting it rest 5 minutes and gently stretching it out again. Just don’t knead the dough again – you’ll pop all the beautiful gas that took 1.5 hours to create!

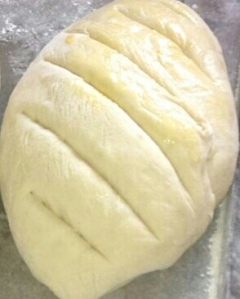
6. Turn the bread over so that it is seam side down. Cover the loaf with a damp kitchen towel. Repeat with the other dough ball. Leave the loaves to rest on your well-floured pizza peel or cutting board for 30 minutes. After resting, take a sharp paring knife and make 3-4 shallow, diagonal slashes on the surface of the loaf. This allows the steam in the bread to escape so that it expands evenly during the baking process. Using a brush, gently brush beaten egg on top of the bread, this will give it a lovely golden look when it’s ready.

IMG-20131026-WA0008-1-1

7. Gently place your bread into the oven and let bake for about 25 minutes.

The Wonders of Bread

Woohoooo Yummy bread.